Old Friends and New.

I had a chance to finally get my shop cleaned up, so I figured I take a few pictures while things were looking good.

First, I don’t know how many people use these aerosol sprayers, but I’m totally hooked. I stumbled across the recommendation on owwm.org (aka the best site on the internet), and picked one up earlier this year.

I found one on ebay for around 30 bucks, and picked up a gallon of wd40. You just fill it up 2/3 with your solvent, and then pressurize it.. I know it sounds stupid, but spraying wd40 out of a can is for chumps once you realize this thing is around. It puts out such thick, fine mist, you just want to keep on spraying things. I usually just walk around the shop once every few weeks and lay a coat of wd40 on anything that’s metal. Really enjoyable.

I made it to WIA (woodworking in america) in october, and was able to pick up a few things I’ve had my eye on the past couple years.

A bronze No.4:

Bronze low angle block plane:

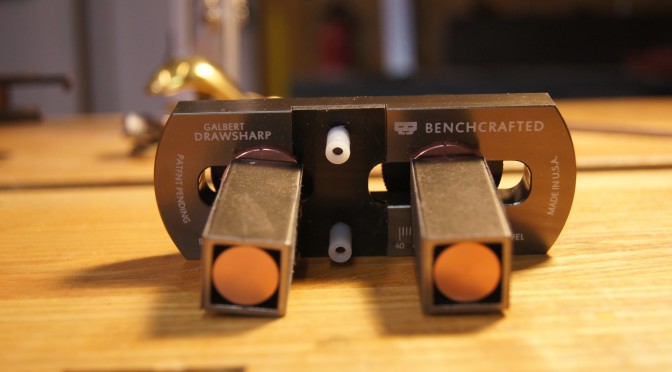
And the Galbert Drawsharp! Pete didn’t know it, but talking to him was the highlight of the weekend. It was also great to talk with Tim Manney, and I put my name on his list for his upcoming adze.

Some other additions to my shop include the new(ish) dewalt brushless 20v drill and impact driver. I had dropped my drill a few years ago and bent the spindle slightly. I had been eyeing some of the festool drivers, but frankly, these are really nice and waaaaaay cheaper.

The new 20v is much smaller than the old 18v (and much lighter).

Since we entering winter, I also picked up a shop heater.  I generally can deal with the cold pretty well (I live in Nashville, after all. It doesn’t get that cold down here), but I had a couple glue up issues last year due to low temperatures, and that’s annoying.  I don’t need to bring the temperature in the shop up to 70 degrees, but getting it to like 50F would make for reliable glue-ups I think.

Now that I’ve got the heater, my 3-legged cattle dog mix likes to hang out inside the shop a little more often.

Oh yeah.. Moved those book cases inside. I’ll write up a longer entry on them once I get the glass installed.  Laminated safety glass is EXPENSIVE.

– Matt
Everything and Nothing.

That’s what I’ve been up to.  I don’t nearly get the time I *need* out in the woodshop these days.  So, I’m going to condense some things that I’ve been meaning to post separately.

First, a new dovetail saw! I bought a badaxe tenon saw back before it was cool to have one (subtle gloat), and I finally got around to ordering a dovetail saw from Mark as well. There wasn’t anything wrong with my veritas dovetail saw.  But man, this one sure is pretty.  Cherry handle, stainless back, stainless sawnuts.  I was going to get the 12” dovetail hybrid saw, but I’m glad I went with the 10”.  This thing is plenty agressive (re: sharp).  

Cuts like a dream.  What have I been dovetailing?  Well, I’m almost done with a 5-drawer shaker table.  Just need to put bottoms in the drawers and throw some knobs on.  One of these days…

I picked up a top section to my toolbox on black thursday, which necessitated some rearranging in the shop.

Also: don’t buy driver heads at harbor freight.  This is just the first three that snapped in a row.. I think I went through 7-8 within 10 minutes.

I’ve done a few other things as well, and have plenty coming up.  Moxon vise, benchcrafted criss-cross, etc.. But we’ll see when I can get some time ;-).

– Matt

Saw Set..

About a year or so ago, I posted about a wenzloff tenon saw I had, and how it had minimal set..  Basically, it had almost zero set, and was binding in the wood something fierce.  At the time, I had concluded that it was probably my fault, and not the saws. I was probably ham-handing the thing, twisting it in the cut, blah blah.  Well, the saw just collected dust. I could cut pretty competently with my LV rip carcass saw, and actually could rip pretty well with my Bad Axe x-cut tenon saw as well. So, for me at least, the wenzloff was a pretty piece of art, but completely un-functional. The worst kind of tool. 

Boooooooo.

I needed to reset the teeth. I knew I had to do it, it just took me a year or so to grow a pair. I finally realized that if I screwed the saw up badly, it would just continue to do exactly what it had been doing, which was to go unused.

So, first I grabbed my saw set.  For some reason, my dad had an unused stanley saw set that I picked up last time I was in MD.  I gave the directions a quick read, and haphazardly set the depth and TPI setting.

According to my micrometer, we started with about .027 of set.. Although, frankly, it’s a little hard to measure really accurately. The saw plate is .025, so in any case, there is almost no set.

So, I went along and set each tooth to something *more* than what it was before. I’m not really sure what it was, and I didn’t really care. See, I had a trick up my sleeve. I read an article on how Mike Wenzloff uses a vise and paper to evenly set his saws. It’s worth reading, you can find it here.

Actually, reading that article again, it says that Mike puts about .002” of set on his saws, which lines up with my measurements pretty well. Well, I think .002 of set is WAY too little for me. 

So, wrap the blade in some paper (more than Mike suggests in that article because I want more set). Then stick that thing in the vise and crank down.

Anndddd???  I ended up with about .006 of set.  

Maybe that’s too much set, I don’t know. But the saw sure cuts a lot easier for me now. No binding at all.  Maybe I’ll reduce the set a little in the future, but at least I’m happy again.

Now it cuts as pretty as it looks.

– Matt

post-script: I looked on Lie-Nielsens website to see if I could find how much set they employ.. On their thin-plate tenon saw (.02), they claim the set should run between .004 and .006, so I’m right in line with them.

Shaving Horse Finis.

I finished it awhile back, but realized that I never posted any pictures of it.  Interestingly enough, after I had finished it Peter Galbert posted an article about this specific design and some his problems with it here.  And then, Brian Boggs responded to those critiques here! It was probably the most exciting week of shave horse discussion that will happen in my lifetime.  You think I’m joking.

Anyways, it came out splendid.  I still need to upholster the seat, but I’ll get around to that when I gets around to it.  I haven’t used it much, but hopefully I rectify that issue this spring.  

Picture time!

– Matt

A Bad Axe Restoration

After spending a couple an hour or so cutting paper thin slices of wood with my newly restored miter saw, I sent Mark @ bad axe toolworks an email thanking him for doing such a nice job. Mark promptly replied (like always), informing me that it wasn’t actually him who had restored and sharpened my saw!!  WHAT?!  But it still cut so well!  How could anyone else have done such a good job?

Well, that mysterious sharpening-savant is Phil Jones, who joined Mark a couple months back at Bad Axe. Phil is an Army guy (like Mark), and has a background in Aviation mechanics. Which I assume means that he’s spent a long time working on things a lot more complicated than saws.

Mark sent me an email detailing all that they did for my saw; I hope he doesn’t mind, but I’m just going to paste the email here, he explains things a lot better then I.

Matt,

Your saw required retoothing. There are two ways of doing this; one is via Foley retoother, an automated punch and die process that completely establishes a brand new toothline. It also eats up between 1/8” and ¼” of real estate, so this is a retoothing by last resort. The other (preferred) method is to retooth with different kind of machine and by hand. We do this with an Acme Handsaw filer, which mechanically gives us a consistent rake, bevel and gullet; however, the ability to crowd a larger tooth to bring it in symmetry with a smaller tooth, and the amount of depth pressure as the file slides through the gullet is controlled entirely by hand.

Setting follows the retoothing procedure, and we do this via hand or foot-operated trip-hammer set (the most accurate form of setting).

Then we lightly joint the new toothline.

And that’s followed by a finesse sharpening entirely by hand. This is what you’re seeing in the shot of Phil using the Acme Handsaw Vise with it’s 28” span. Seriously cool piece of gear.

After exhaustive test-cutting to ensure that there is just the right about of set, that the saw cuts with no drift, and that every trooper on the firing line is pulling the trigger (all the teeth are the same height), the saw is ready to box up and ship.

So—this is not your average mechanical retooth and run through a Foley automatic saw sharpening machine, you find done on so many vintage saws (you can always tell when this has been done by the bow along the entire toothline that wasn’t hammer-smithed back into true). Ours is an involved process that usually takes about two hours to do right, sometimes three.

At any rate, this is the level of work Phil did to your miter saw, and I felt that a bit of the story and the man behind it was due. Phil has started up his own company under Bad Axe training and sponsorship, and is standing by for orders. Just go to the ‘Sawvival’ guy.

– Mark


Here’s a picture of Phil Jones doing work.

And here are a couple more pictures of my saw:

And a nice, clean cross cut:

And let me just say, the level of customer service you get with Bad Axe is out of this world.  I’ve only got one Mark’s “new” saws (I ordered one of his 16” tenon saws way back when that was all he offered), but it is one of my favorite tools in the shop. I’ve ordered tools from other custom makers, and Mark provides communication, feedback, and advice that is far beyond what you get anywhere else.

Hopefully I’ll be able to order some more saws from him in the near future… I probably drool over his saws more than most people (a stainless steel backed “doc holiday” w/cherry tote is steadily working it’s way to the top of my “buy” list).

Anyways, thanks again Mark!  And a big thanks to Phil Jones for doing outstanding work on my miter saw.

– Matt