Furniture of Necessity

Chris Schwarz talks a lot about “furniture of necessity”, and that’s what I’ve been working on lately.  However, I define the phrase a little differently… I’ve been working on things that my wife has declared necessary that I finish *right now*.

To that end, I’ve built a bed for my son, am halfway done with a set of bookshelves, and will be constructing a toy organizing thing as well next week. Hopefully by the time October hits, I’ll get to start working on some new office furniture. And maybe once December rolls around, I’ll get to work on some of my shop projects (infill plane kit, carving vise, etc).

Sarah wanted a “pallet” bed.  So that’s kinda what I built. I added the removable side rail after Porter fell out a couple times.

image

image

image

Also added 5 recessed lights and a pendant lamp to his room, so that took up a couple days as well.

Last weekend I had the opportunity to go help Greg Pennington put up his new timber frame shed.  THAT was a lot of fun. You can check it out on Greg’s blog.

image

image

image

image

Man, I wish I had space for one of these at my house. And I wish I had a sawmill, and a tractor, and on and on. I may have to move out into the country after all.

– Matt

Happy Fathers Day!

Please excuse the following rambling post.. I’ve had quite a bit to write about, but can’t seem to find the time. So here are some pictures of the activity (or lack there-of) in my shop.

First, some purchases I’m quite excited about.  I received a reamer from Tim Manny (by way of Pete Galbert).  You can read about / order them here. I actually had quite a bit of a mixup with Tim about my shipping address, but he was super-patient with me and it eventually made its way here. Thanks Tim!  

image

What a great looking tool.  I love the set-screw to adjust depth of cut, and how it’s tipped in brass. 

image

image

I haven’t really had a chance to use it yet, but I did make a quick block to store the reamer in.. Tim recommends using a block of wood with a hole reamed in it to keep the tool nice and tight during storage. Drill a hole, ream it, and voila!  Beautiful and functional (the reamer, not the block of wood).

image

Tim actually just started blogging, his site is at: timmanneychairmaker.blogspot.com.  Just looking at his first few posts, I can tell it’s a site I’ll revisit often.

The *other* thing I received was the hardware for benchcrafted’s carvers vise. I’m really excited about this one. 

image

 Benchcrated always does a quality packing job.. image

I don’t have wood for it yet, but I’ve got a line on some 16/4 mahogany. Although that really won’t match my bench; I may build it in ash or maple.

image

image

It will probably be late summer before I get a chance to get started on this one.. I’ve got a long list of projects I was supposed to finish months ago.

Speaking of which.. I finally finished that 5 drawer table I started almost a year ago.

image

The design was inspired (or copied completely) from an article written by Garrett Hack in FWW.  I’m sure this is one of many, many versions of this particular piece that have been built over the years. Cherry / maple (with poplar drawer bottoms, I ran out of maple), most of which came from my Uncle Mike’s sawmill.

image

I turned the knobs myself, which I’m quite proud of. To say I’m a novice turner is an understatement.

image

Nice grain on the drawers and the top..

image

image

One of the projects I’m getting caught up in is a new room for our son, Porter. We wanted to put up barnwood on a wall, so we went out and found some (and paid through the nose for it). Then we realized it was covered in lead paint, so now it’s just sitting in my garage awaiting an unknown fate. I ended up applying a steel wool / vinegar mix to rough sawn poplar, then rabbeting all the boards and nailing them up. Came out looking pretty spiffy, I think.

image

I’m starting on some bookshelves for our living room next, here’s the first glue-up of many to come..

image

And of course, the driving force behind most of these projects.. 

image

(at the beach a few weeks ago..)

Happy Fathers Day everyone!

– Matt

things keep following me home!

All these poor orphan tools.. I adopted another one today.  A 1hp three phase Queen City “High Duty” pedestal grinder. I’ll write up the addition of a VFD and rewiring it.. I want to cleanly add speed control if possible, and hide the VFD around back.  We’ll see.

*** If anyone has a set of wheel guards laying around that would fit, leave me a comment.. I’d like an original set! ***

image

image

image

cannot abide.

I’m spoiled as far as vises go. I’m used to effortless clamping. So, while there was absolute nothing wrong with the vise I picked up last week, I had to tune it up. You could feel the accumulation of 80 years of dirt and grime when you spun the handle.

So! I gave it a good soaking in evaporust, then hit it with a wire wheel and brush to git rid of all the rust and grime.  I took care to make sure all the bearing surfaces where super clean and smooth, and hit the acme screw with a coating of lithium grease.

I’m claiming that it’s now BETTER than factory-new condition, because the collet (garter?) didn’t seat very well due to a rough casting. I took a file to it, and 10 minutes later it was seated much better. This removed at least 1/8” of play and probably a full turn of backlash.

image

One of the coolest bits on this vise is the handle.. There’s a little set screw right on the head that squeezes a little metal disc against the handle. This allows you to position the bar whereever you want, and it will stay there (notice how its NOT sliding down in the picture above?)

Here is the little set screw in the center of the hub:

image

And here are the pieces pulled out. The set screw compress the spring against the metal disc, which pushes against the bar handle.

image

Here’s a video showing the vise in action after cleanup. So smooth. The question is where to put this thing? I kind of want to build a platform for it so I can move it on and off my workbench, but.. I shouldn’t really be doing metalwork on my workbench.  So we’ll see what happens.

– Matt

Vise Vice.

Can’t seem to get enough of them.  Found this beaut on craigslist a couple days ago.  I won’t claim that I got it for a song, but I feel pretty good about the price. 

A Parker no. 134 from 1928.  Apparently called the “Big Bear”! Here’s a flyer (gotta love the internet):

This one seems to be in incredible shape.  I still think I’m going to pull it apart to clean everything up with a wire wheel and re-grease the innards though.  That way it will be good for another 87 years.

Pretty nice! Also, the mini anvil on the back makes this thing just that much cooler.

I’m sure this won’t be the last one I buy…

– Matt

criss-cross!

Smooth like butter.  Smoother, actually. Maybe like crisco.  Or white lithium. I’ve got the chop shaped, lined with leather, and boy-o-man this thing has got some serious grip, breh.

image

Always needing to point out my mistakes: I experienced a little delamination of the two pieces of ash I had glued up for the chop. It was only about 1/8” deep, and a hair’s breadth wide. Just visible, really; nothing that would affect function.  Anyways, it really annoyed me. So I routed a groove and glued in a patch. You can see that strip down the bottom half of the chop in the picture above, that’s the patch. I’m not actually sure this looks any better, but I feel good about it.

I wasn’t really looking forward to the larger chop.  I liked the proportions of the old one, with the bottom of the chop ending at the top of the rail.  However, I think it came out well enough. It is huge, no denying it. But it doesn’t look just weirdly long. Maybe because this one is a bit on the wide side (10”). In fact, that wheel looks kind of tiny now.. Maybe it’s time for an XL option, Jameel?

image

Not really sure how, but I ended up with a slight amount of toe-in.. I wasn’t trying to achieve it, but there it was. Which is super, because the top of the chop hits your piece and then squeezes right in.

image

The action on the criss-cross is different. The glide version of this vise hit your work with a *thunk*. From 0-100% hold instantly. This version ~squeezes~ your work more like a normal vise. I suppose it gives you a little more control. But don’t get me wrong, it is effortless. Spin the wheel, your work is immobile.

Anyways, I’m really happy to have it on. No more pin, no more re-adjusting the glide wheels because I cranked down on the wheel and forgot to adjust said pin. It just works, plain and simple. Super elegant and easy to install.

image

We went to the nashville flea market this past weekend. I have yet to leave that place without a new tool. Picked up a nice 2” slick and a hewing hatchet. You watch something like alone in the wilderness and you realize these are tools you *must* have.

image

I think it’s time I started building my dining room chairs..  Greg Pennington has been posting a lot lately and giving me the itch; I’ll need to run up there to trace the bending form for his balloon back.  And sneak off with some green white oak… 😉

– Matt

smooth action.

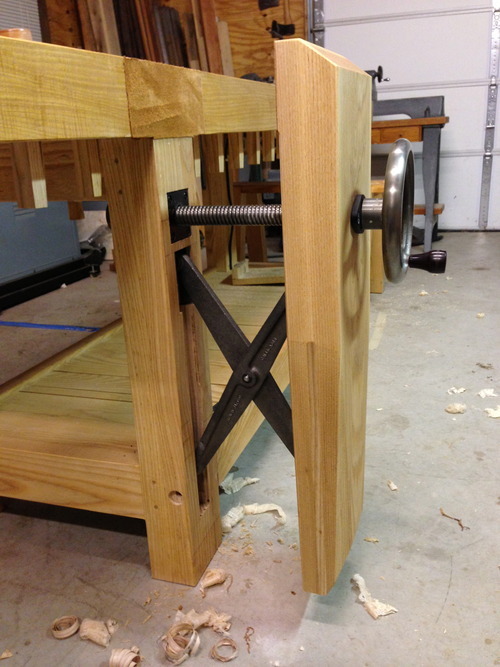
My wife commented that most of what I build seems to have to do with my workbench.  I suppose that’s a valid casual observation.  Just two years ago I finished up what was supposed to be the ultimate, impossible to beat, best bench in the world.  And it was! Then, I ordered and put together a moxon vise (which to my wife’s eye, is just another part of the bench). Now I’ve got the bench pulled apart to retrofit the benchcrafted criss-cross.  Neccesary?  No.  But neither were those holdfasts from lie-nielsen. 

While I’m not totally done yet, I’m 90% there.  Just need to shape the chop and put a finish on it.  The install went really well, and was pretty easy. One thing that made it much easier was ordering a 1/2” end mill roughing bit for my router. Jameel talked about these here. I didn’t order the exact one he talked about because I like to order everything off amazon.  I’ve got this one, and I have to say it really worked well.  

I hope there’s no downside to using a rather large chop.. This one is a full 10” wide and 3” thick.  I’m not sure how heavy it is, but it is HEAVY.  

And a picture with the handwheel attached.  This thing is pretty smooth, just as smooth as the glide w/roller brackets.

One slight detail for people retrofitting this to their existing bench built from benchcrafted plans.. That mortise in your bench leg runs right through the knock down hardware.  Benchcrafted offered some solutions, like doubling the width of your front rail and moving that nut back, but that seemed like way too much work.  Plus, I’ve never take the bench apart anyways (and I have moved shops).  So I just pulled the bolt out and put a couple pegs in.

Works pretty well! I’ll post some more pictures when done. I’m also almost done with this piece (finally).  

Pretty excited!

– Matt

hold it right there!

So, I’d been eyeing some primo holdfasts from Peter Ross for awhile now (read about them here).  The ones I’ve got work just fine, I just have never really been happy with how they look.  I’ve currently got four of the grammercy tools holdfasts (seen here).  Now, there are a couple things about the grammercy tools holdfasts.  #1 is that they are cheap.  $20 a piece.  #2 is that they were really the only option available (until now) unless you wanted to pay a blacksmith a small fortune to make custom ones for you (see above article about Peter Ross).  There is one bad thing I’ve noticed about the Grammery Tool’s holdfasts, and that is that they’ve tended to burnish the holes that I use them in. So, once every few months I’ve got to scuff up the holdfasts themselves with some 100 grit paper, AND scuff up the holes that I use them in. Not that bad, but still kinda annoying because I put it off.

Enter Lie Nielsen.  They started selling their own holdfast a couple weeks ago, which has a nice traditional look.  So I went ahead and ordered a pair.  I’m hoping since these are cast and have a much rougher surface, they won’t require constant fiddling and scuffing in the long term like the TFWW ones.

The lie nielsen is a little longer in the shaft, which in theory would give more height capacity; in reality tho, you never use them at that height. The TFWW holdfast has a little more reach.. Sometimes that’s good, sometimes it’s in the way.

There’s not much to review, honestly. Both hold things down when you whack ‘em with a hammer.  I really like how the LN’s look though, and isn’t that what its all about? 

I’ll report back if the LN’s have the same “burnishing” effect that the TFWW’s do.  I don’t think they will, but only time will tell.

I’ve got some lots more updates coming up!  Finishing up a project and installing a Benchcrafted criss-cross..

– Matt

Everything and Nothing.

That’s what I’ve been up to.  I don’t nearly get the time I *need* out in the woodshop these days.  So, I’m going to condense some things that I’ve been meaning to post separately.

First, a new dovetail saw! I bought a badaxe tenon saw back before it was cool to have one (subtle gloat), and I finally got around to ordering a dovetail saw from Mark as well. There wasn’t anything wrong with my veritas dovetail saw.  But man, this one sure is pretty.  Cherry handle, stainless back, stainless sawnuts.  I was going to get the 12” dovetail hybrid saw, but I’m glad I went with the 10”.  This thing is plenty agressive (re: sharp).  

Cuts like a dream.  What have I been dovetailing?  Well, I’m almost done with a 5-drawer shaker table.  Just need to put bottoms in the drawers and throw some knobs on.  One of these days…

I picked up a top section to my toolbox on black thursday, which necessitated some rearranging in the shop.

Also: don’t buy driver heads at harbor freight.  This is just the first three that snapped in a row.. I think I went through 7-8 within 10 minutes.

I’ve done a few other things as well, and have plenty coming up.  Moxon vise, benchcrafted criss-cross, etc.. But we’ll see when I can get some time ;-).

– Matt

Finis. (almost)

In what seems to be becoming a habit, I’ve taken a before shot, no progress shots, and a few “complete” pictures.  Well, I never claimed to be a photograher.

Here’s a “before” picture.  In fact, that was just two posts ago! Hmmm, this doesn’t seem to be the most active space, does it. 

Hey, that was only the end of May? Four months isn’t so bad.  Anyways, it wasn’t in that bad of shape at all.  Check out my other post for more details.

So, what did I do? Replaced the wheel bearings, replaced any rubber bits, replaced the guides (with fancy ceramic ones), new belt, new blade, new wheel tires, and a 6” riser block. Oh, and a new high-tension spring, new guide post, and some reproduction cover knobs. And some paint. If you’ve got one of these that you’re restoring, look up “Iturra Designs”, they’ve got you covered for parts.

Pictures! Reminder: this saw is 72 years old.

The best part is that it actually runs really nice. Very little vibration, lot’s of resaw capacity, plus bonus vintage good looks. You may notice a piece of cardboard wedged under one of the feet.. I actually haven’t repainted the original mobile base yet, I’m having a super hard time locating replacement casters. The original ones sat so long they developed a flat spot on the wheel, so they don’t really function well as wheels anymore.

All in all, it was a lot of fun to restore. It’s amazing what you can do with a brass wire wheel and some spray paint. If you’ve got an old piece of woodworking machinery laying around somewhere, chances are that it’s just as good or better than anything you can buy new. So don’t throw it away! Restore it, or better yet just give it to me.

Now I can actually get back to some woodworking projects. I’ve actually had a few in progress, just no posts about them yet. I’ll have a report up on a new moxon vise and a badaxe saw in a few weeks though. Let me just say, the combo is supersweet.

– Matt