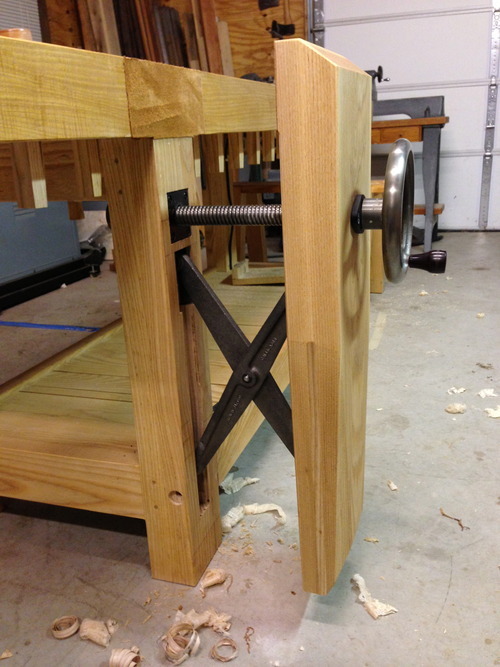
criss-cross!

Smooth like butter.  Smoother, actually. Maybe like crisco.  Or white lithium. I’ve got the chop shaped, lined with leather, and boy-o-man this thing has got some serious grip, breh.
image

Always needing to point out my mistakes: I experienced a little delamination of the two pieces of ash I had glued up for the chop. It was only about 1/8” deep, and a hair’s breadth wide. Just visible, really; nothing that would affect function.  Anyways, it really annoyed me. So I routed a groove and glued in a patch. You can see that strip down the bottom half of the chop in the picture above, that’s the patch. I’m not actually sure this looks any better, but I feel good about it.

I wasn’t really looking forward to the larger chop.  I liked the proportions of the old one, with the bottom of the chop ending at the top of the rail.  However, I think it came out well enough. It is huge, no denying it. But it doesn’t look just weirdly long. Maybe because this one is a bit on the wide side (10”). In fact, that wheel looks kind of tiny now.. Maybe it’s time for an XL option, Jameel?

image

Not really sure how, but I ended up with a slight amount of toe-in.. I wasn’t trying to achieve it, but there it was. Which is super, because the top of the chop hits your piece and then squeezes right in.

image

The action on the criss-cross is different. The glide version of this vise hit your work with a *thunk*. From 0-100% hold instantly. This version ~squeezes~ your work more like a normal vise. I suppose it gives you a little more control. But don’t get me wrong, it is effortless. Spin the wheel, your work is immobile.

Anyways, I’m really happy to have it on. No more pin, no more re-adjusting the glide wheels because I cranked down on the wheel and forgot to adjust said pin. It just works, plain and simple. Super elegant and easy to install.

image

We went to the nashville flea market this past weekend. I have yet to leave that place without a new tool. Picked up a nice 2” slick and a hewing hatchet. You watch something like alone in the wilderness and you realize these are tools you *must* have.

image

I think it’s time I started building my dining room chairs..  Greg Pennington has been posting a lot lately and giving me the itch; I’ll need to run up there to trace the bending form for his balloon back.  And sneak off with some green white oak… 😉

– Matt

smooth action.

My wife commented that most of what I build seems to have to do with my workbench.  I suppose that’s a valid casual observation.  Just two years ago I finished up what was supposed to be the ultimate, impossible to beat, best bench in the world.  And it was! Then, I ordered and put together a moxon vise (which to my wife’s eye, is just another part of the bench). Now I’ve got the bench pulled apart to retrofit the benchcrafted criss-cross.  Neccesary?  No.  But neither were those holdfasts from lie-nielsen. 

While I’m not totally done yet, I’m 90% there.  Just need to shape the chop and put a finish on it.  The install went really well, and was pretty easy. One thing that made it much easier was ordering a 1/2” end mill roughing bit for my router. Jameel talked about these here. I didn’t order the exact one he talked about because I like to order everything off amazon.  I’ve got this one, and I have to say it really worked well.  

I hope there’s no downside to using a rather large chop.. This one is a full 10” wide and 3” thick.  I’m not sure how heavy it is, but it is HEAVY.  

And a picture with the handwheel attached.  This thing is pretty smooth, just as smooth as the glide w/roller brackets.

One slight detail for people retrofitting this to their existing bench built from benchcrafted plans.. That mortise in your bench leg runs right through the knock down hardware.  Benchcrafted offered some solutions, like doubling the width of your front rail and moving that nut back, but that seemed like way too much work.  Plus, I’ve never take the bench apart anyways (and I have moved shops).  So I just pulled the bolt out and put a couple pegs in.

Works pretty well! I’ll post some more pictures when done. I’m also almost done with this piece (finally).  

Pretty excited!

– Matt

hold it right there!

So, I’d been eyeing some primo holdfasts from Peter Ross for awhile now (read about them here).  The ones I’ve got work just fine, I just have never really been happy with how they look.  I’ve currently got four of the grammercy tools holdfasts (seen here).  Now, there are a couple things about the grammercy tools holdfasts.  #1 is that they are cheap.  $20 a piece.  #2 is that they were really the only option available (until now) unless you wanted to pay a blacksmith a small fortune to make custom ones for you (see above article about Peter Ross).  There is one bad thing I’ve noticed about the Grammery Tool’s holdfasts, and that is that they’ve tended to burnish the holes that I use them in. So, once every few months I’ve got to scuff up the holdfasts themselves with some 100 grit paper, AND scuff up the holes that I use them in. Not that bad, but still kinda annoying because I put it off.

Enter Lie Nielsen.  They started selling their own holdfast a couple weeks ago, which has a nice traditional look.  So I went ahead and ordered a pair.  I’m hoping since these are cast and have a much rougher surface, they won’t require constant fiddling and scuffing in the long term like the TFWW ones.

The lie nielsen is a little longer in the shaft, which in theory would give more height capacity; in reality tho, you never use them at that height. The TFWW holdfast has a little more reach.. Sometimes that’s good, sometimes it’s in the way.

There’s not much to review, honestly. Both hold things down when you whack ‘em with a hammer.  I really like how the LN’s look though, and isn’t that what its all about? 

I’ll report back if the LN’s have the same “burnishing” effect that the TFWW’s do.  I don’t think they will, but only time will tell.

I’ve got some lots more updates coming up!  Finishing up a project and installing a Benchcrafted criss-cross..

– Matt